Search
In this section you will see pictures and brief explanations on how to perform a search for a user.
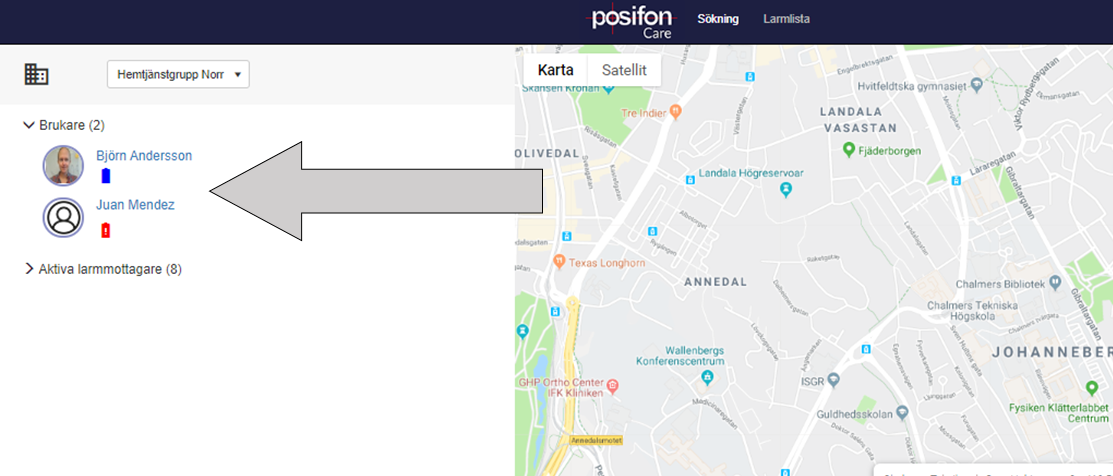
1. Select the user you want to search for.
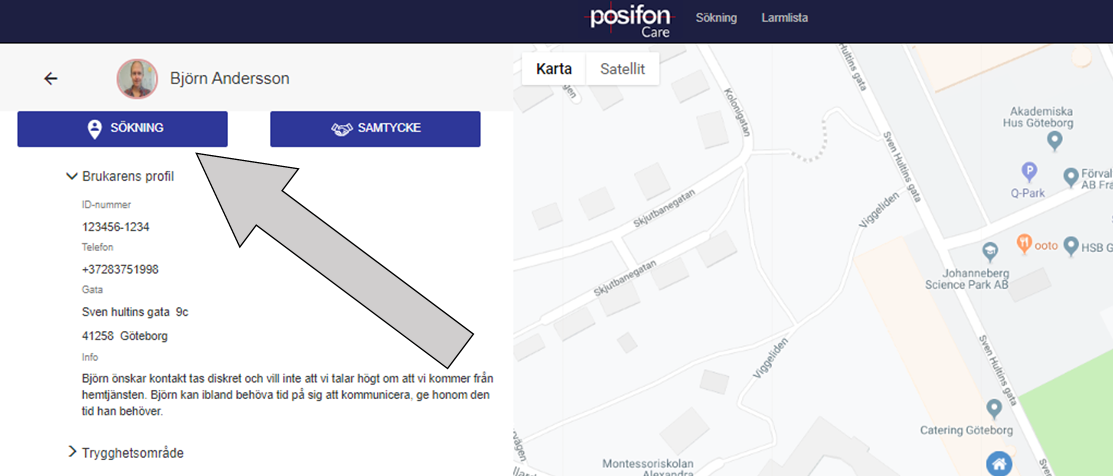
2. click on the ‘SEARCH’ button.
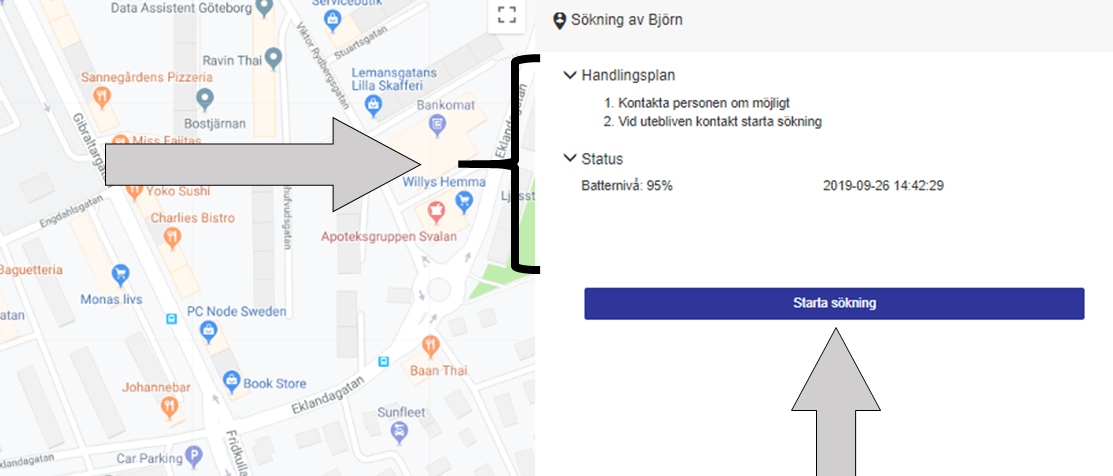
3. on the right part of the screen you will be able to read the action plan developed for the user and the status of the GPS device used by the user.
Under status you can see, for example, the battery level of the device and when the last message was received. To start the search, click on the ‘Start search’ button.
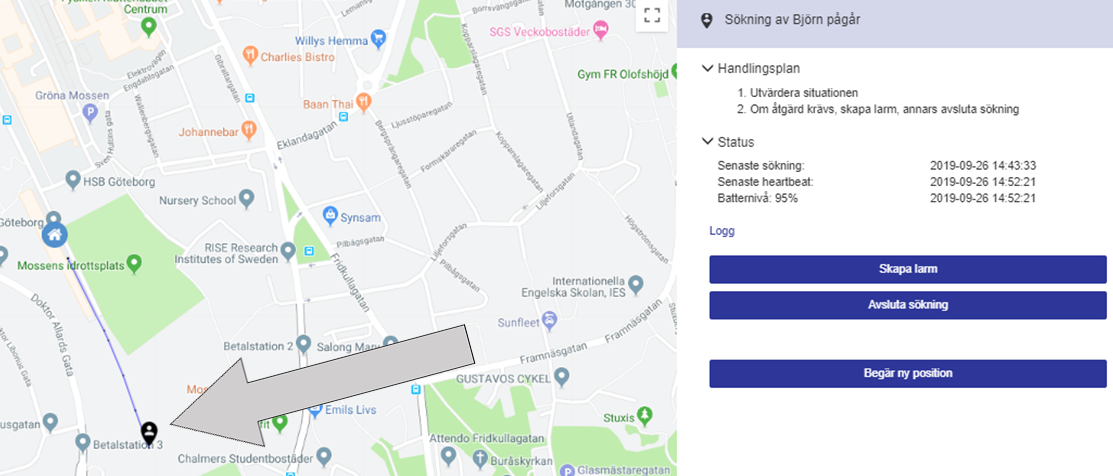
4. Now that the search has started, you will be able to see the user’s latest positions. The user’s position is illustrated with a black positioning drop and the dashed line shows older positions to give an idea of where the user is heading.
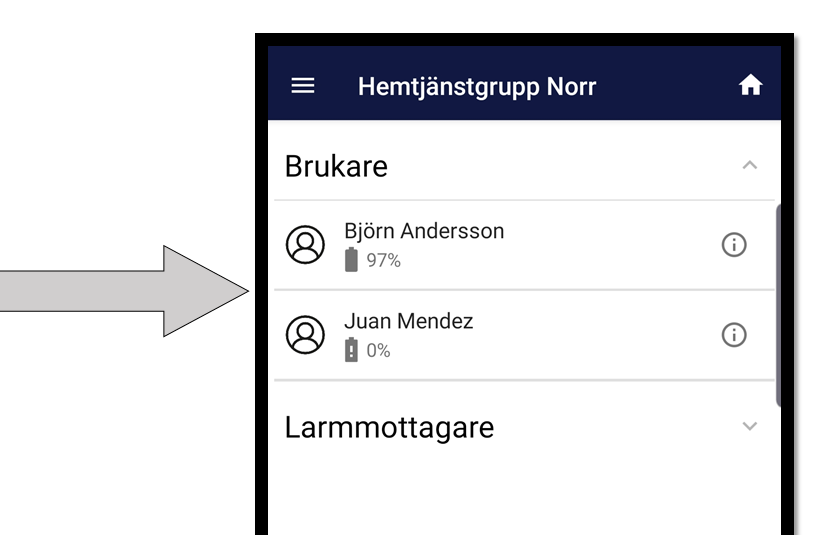
1. Select the user you want to search for.
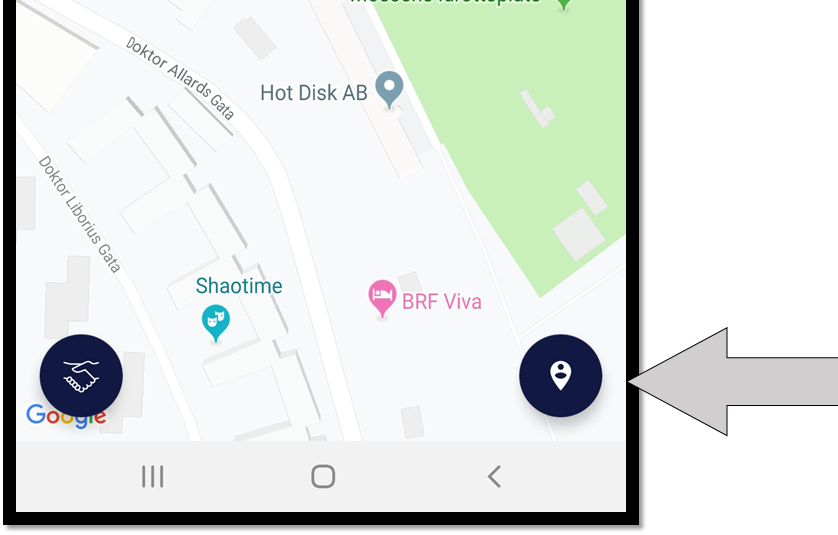
2. press the positioning drop in the bottom right corner.
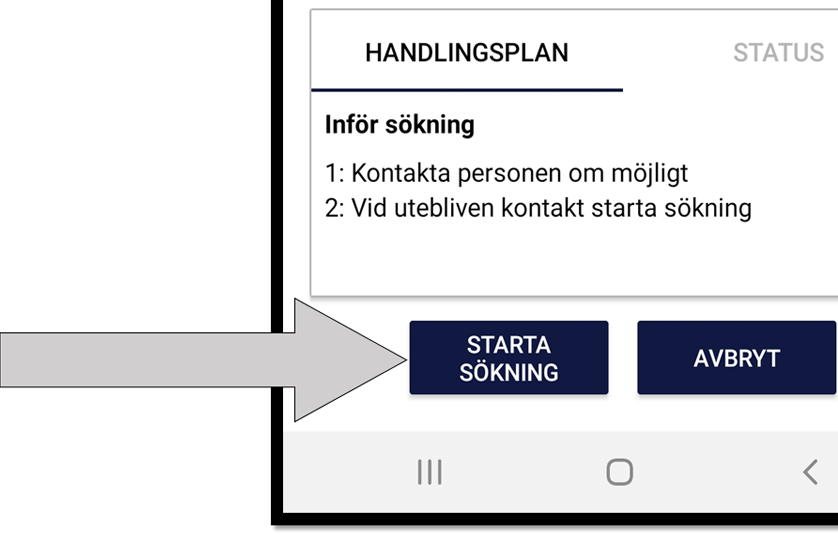
3. at the bottom of the screen you will be able to read the action plan developed for the user and the status of the GPS device used by the user.
Under status you can see, for example, the battery level of the device and when the last message was received. To start the search, click on the ‘START SEARCH’ button.
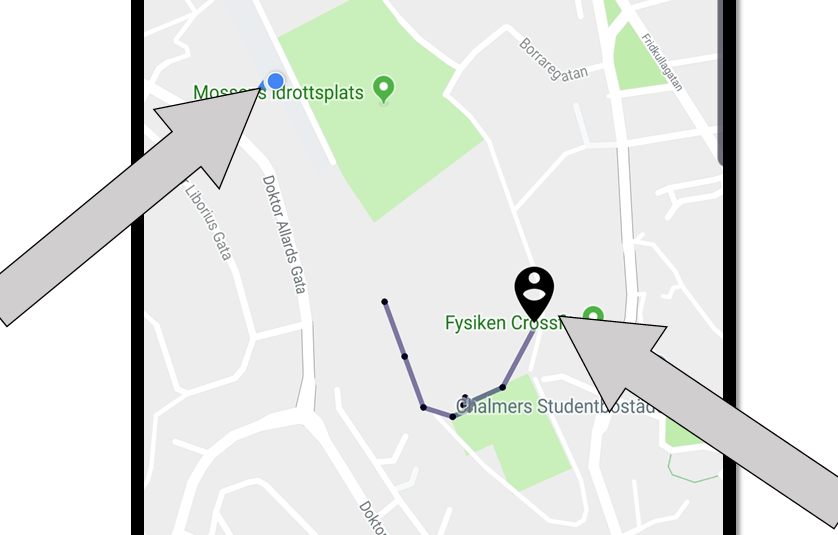
4. The blue positioning point shows your position. The user’s position is illustrated with a black positioning drop and the dashed line shows older positions to give an idea of where the user is heading. If you want to get the longitude and latitude or street address where the user is located, press the black positioning drop.
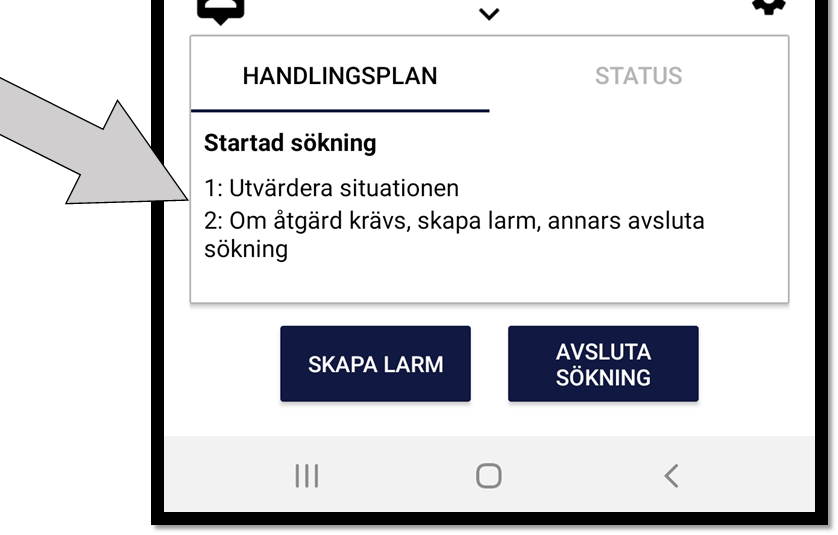
5. Once the search is launched, an updated action plan is displayed.

6. to see information about the alarm the user is using and its battery level, as well as the last received message, you can press ‘STATUS’.
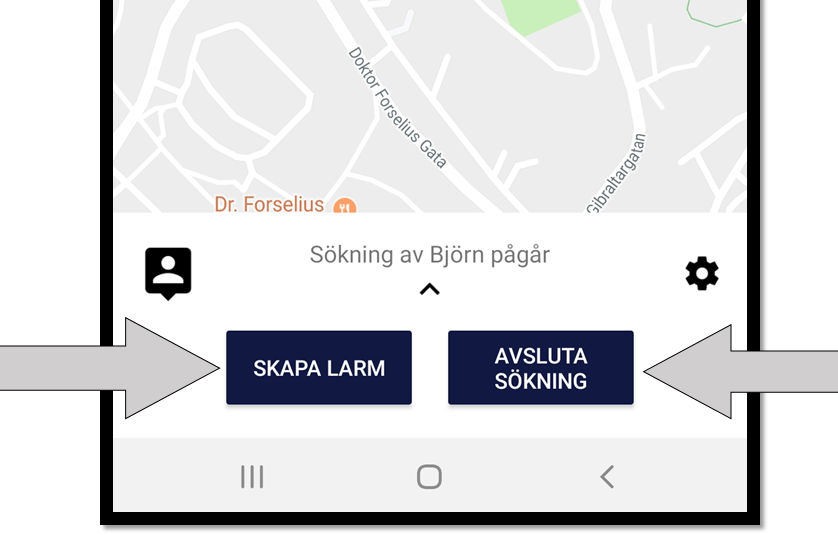
7. if you decide that you need to go and help the user, you can create an alarm to log the event as an alarm event.
If you want to send the information to another alarm receiver, you can press ‘CREATE ALARM’. When you think you are done with the search, you can press ‘FINISH SEARCH’.
Alarm management
In this section, you will see pictures and brief explanations on how to handle the alarms.
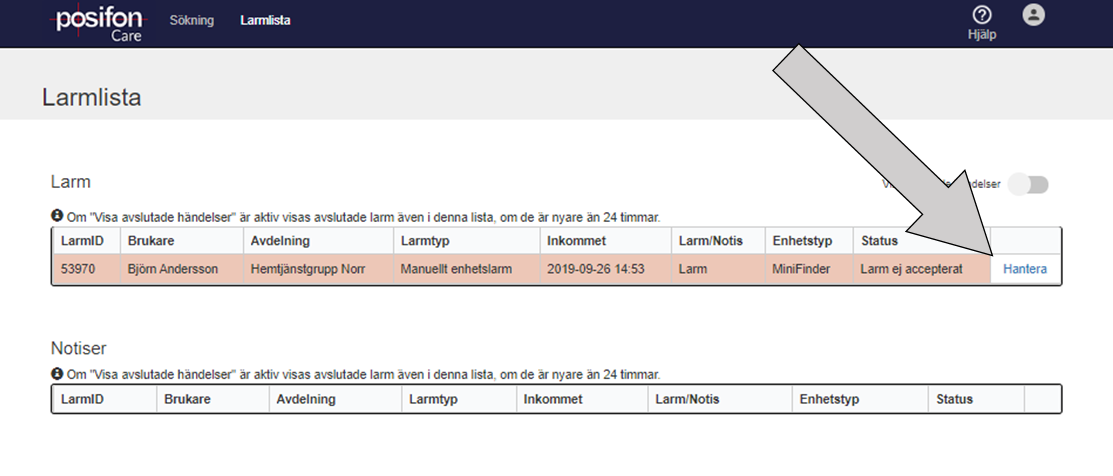
1. When an alarm has been received, you will find it in the alarm list. To manage the alarm press ‘Manage’.
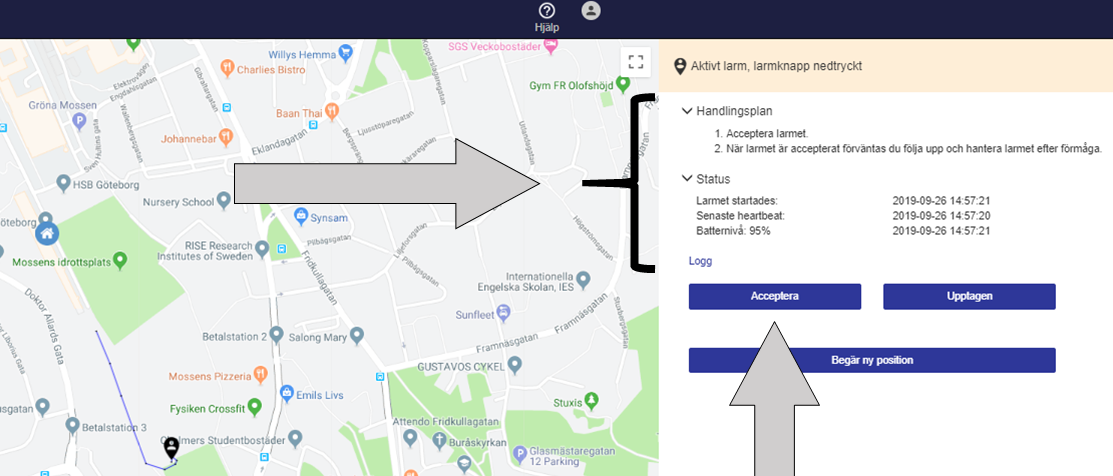
2. on the map you can see the user’s position illustrated by a black positioning drop and the dotted line shows older positions to give an idea of where the user is heading. If you want to get the longitude and latitude or street address where the user is located, press the black positioning drop.
On the right side of the screen you can read the action plan developed for this user and alarm type as well as the status of the device in terms of battery level and last received message. If you want to manage the alarm, press ‘Accept’.
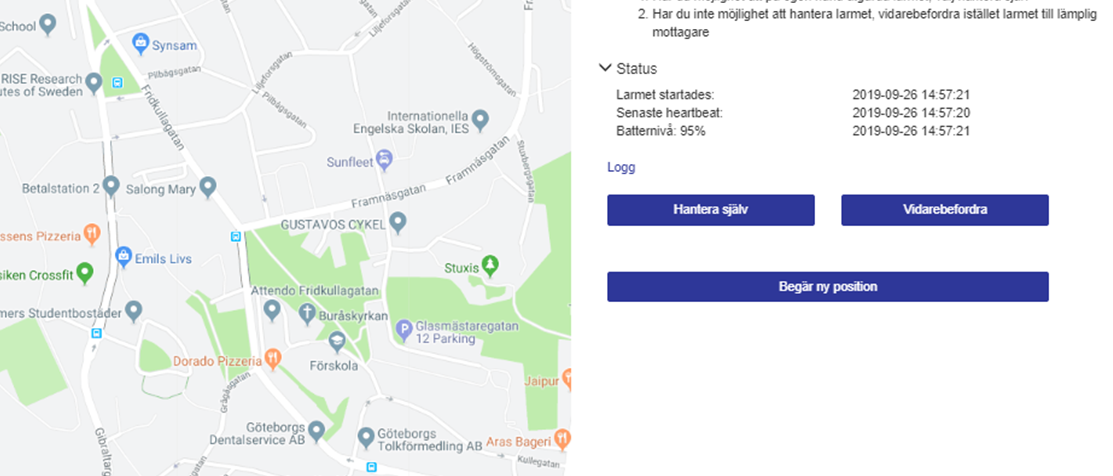
3. if you are going to handle the alarm yourself, press ‘Handle yourself’ and if you have the forwarding function active, you can also forward the alarm to another alarm receiver.
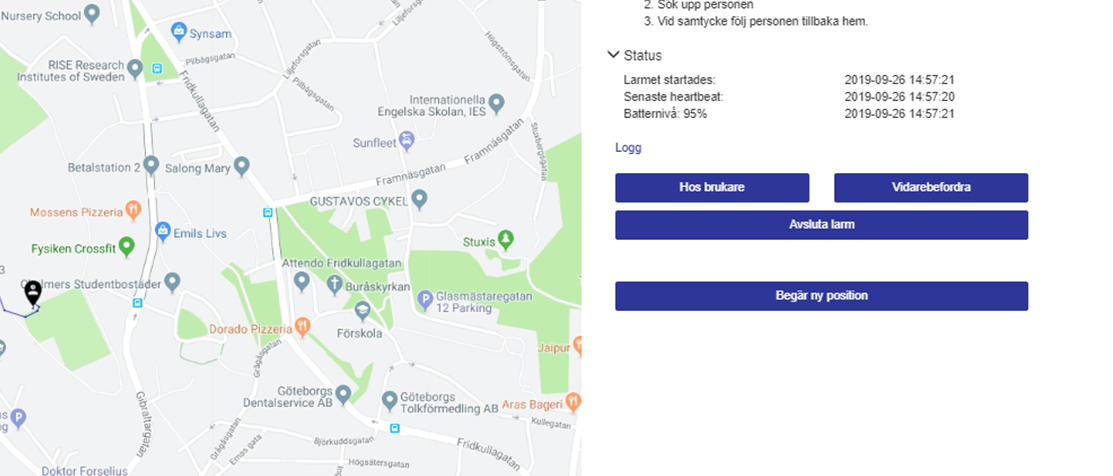
4. you can register that you are with the user in this mode but also call for help from another alarm receiver if you need it by pressing ‘Forward’ if you have that function active or end the alarm if the alarm event is resolved.
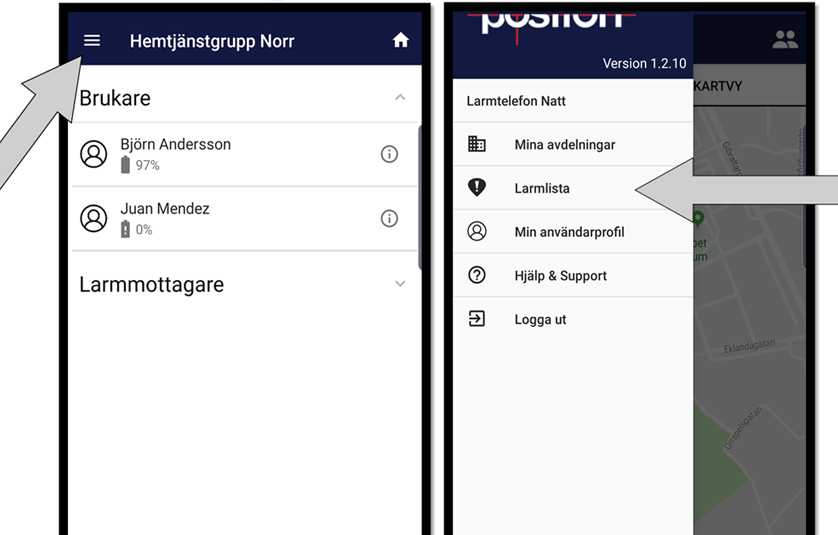
1. When an alarm arrives, usually as a push notification via Android or iOS or as an SMS, you can open the alarm by tapping on ‘Alarm list’.
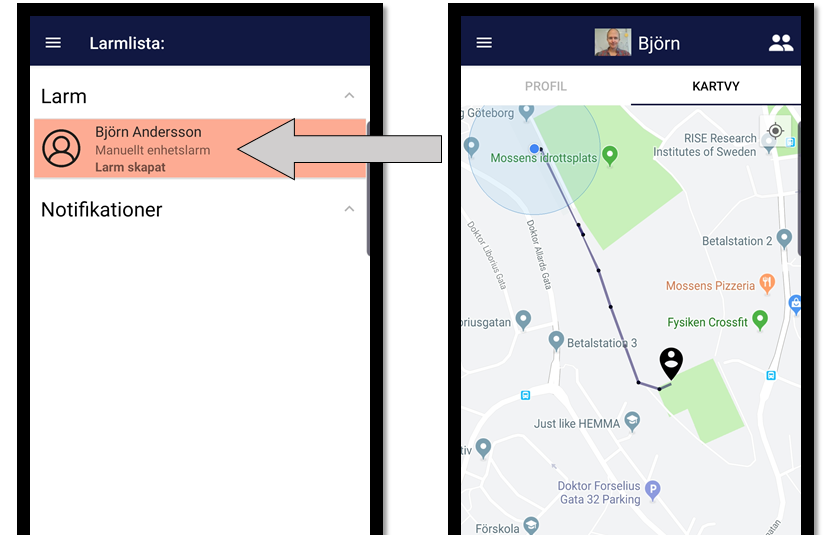
2. the alarm that has been received appears in the list. Tap on the alarm you want to handle. The user’s position is illustrated with a black positioning drop and the dotted line shows older positions to give an idea of where the user is heading. If you want to get the longitude and latitude or street address where the user is located, press the black positioning drop. Your own position is shown with a blue positioning dot.
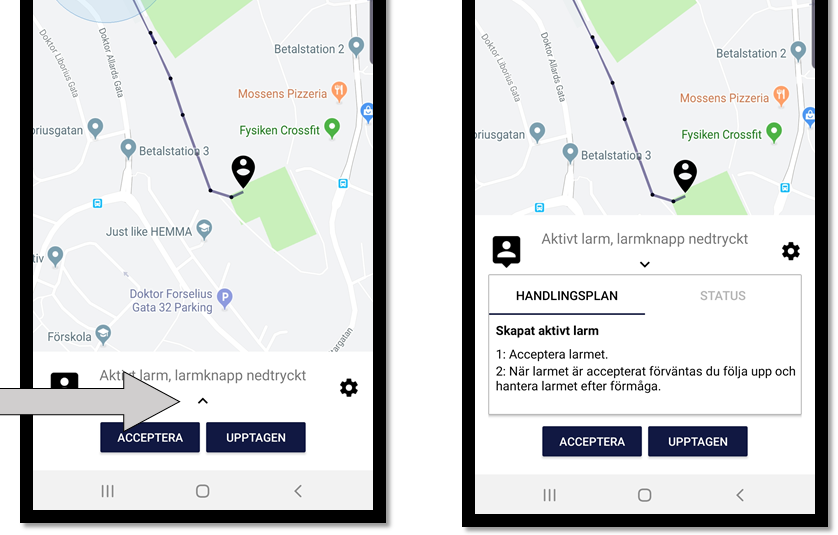
3. To read the action plan designed for the user and alarm type, press the up arrow.
To view the status of the alarm such as battery level and last received message press ‘STATUS’. To minimize the field press the down arrow.
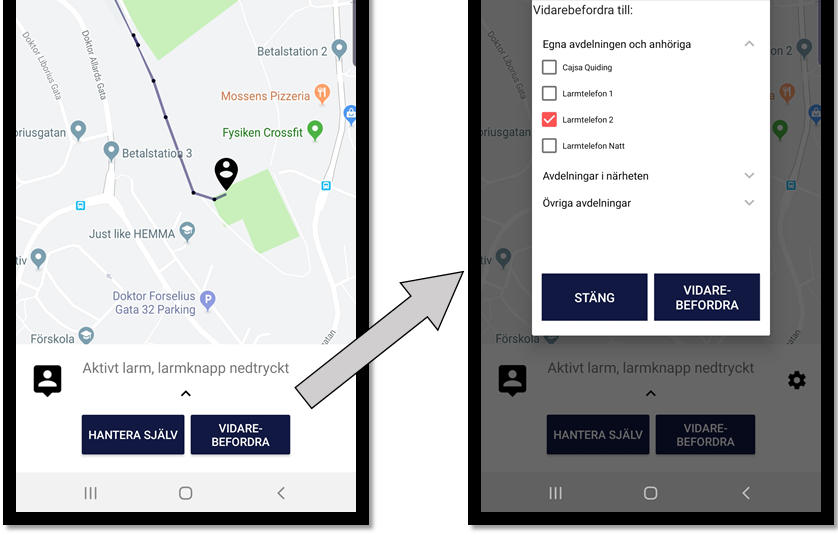
4. If you have the forward function active, you can forward the alarm to another alarm receiver.
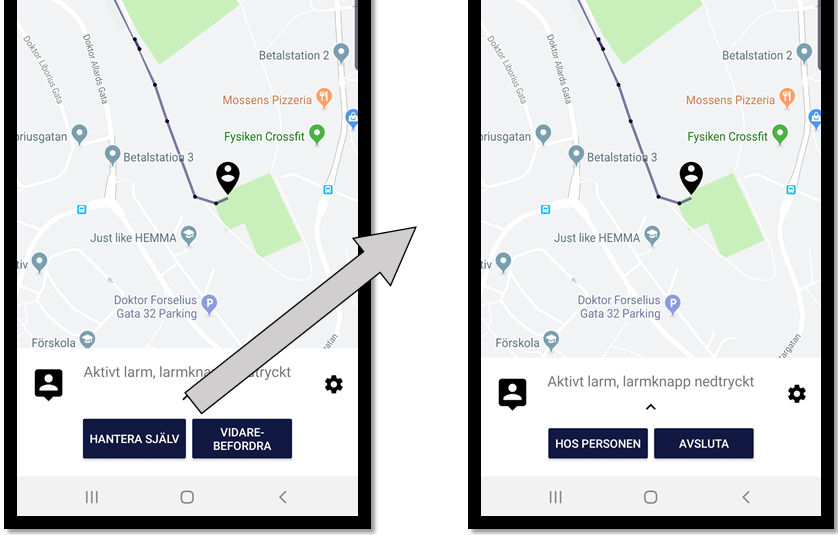
5. If you want to manage the alarm yourself, select ‘MANAGE YOURSELF’.
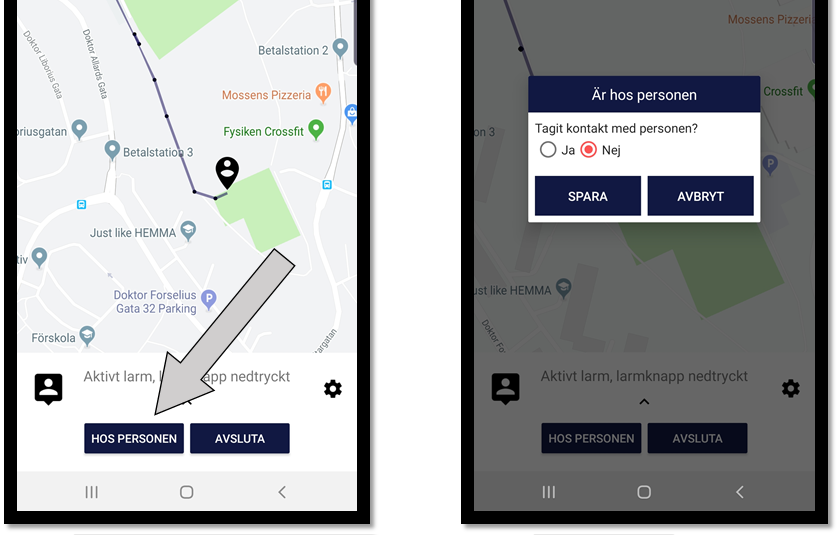
6. to register that you are with the user press ‘WITH THE PERSON’. A pop-up will appear where you can note whether you have made contact with the person or not.
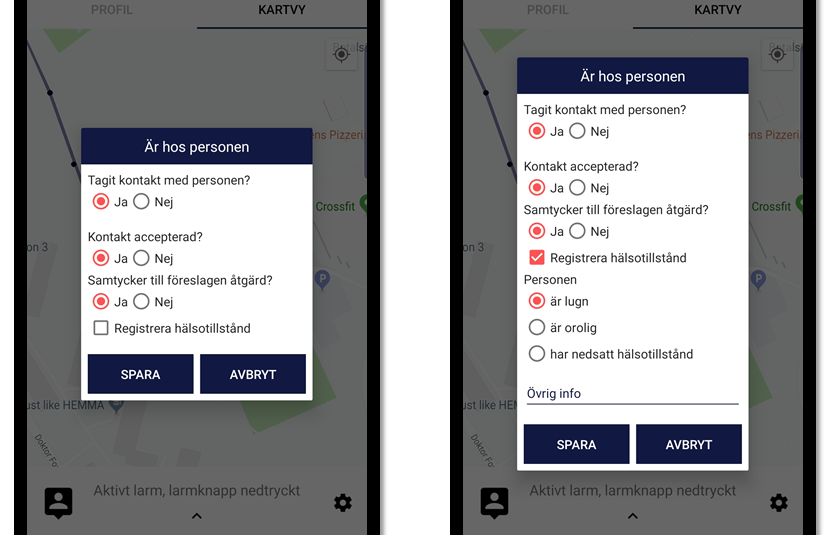
7. If you have made contact with the person, there is additional information you can record.
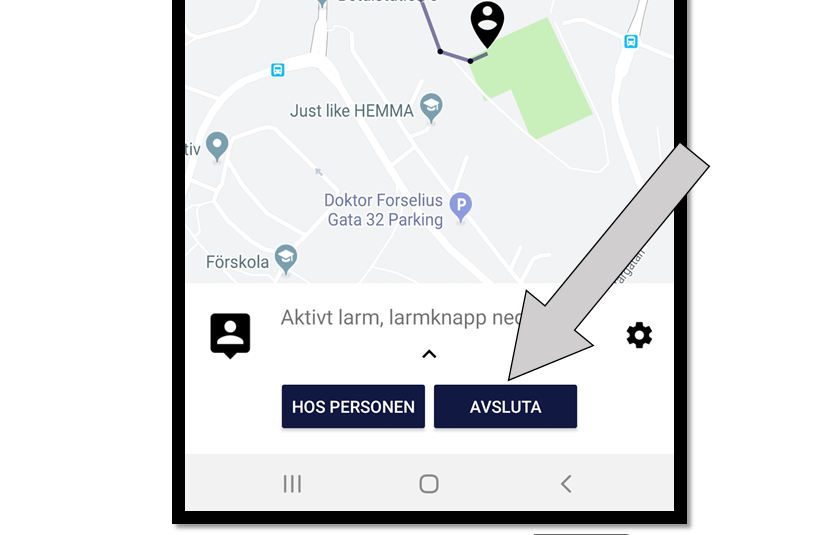
8. When the alarm is finished, press ‘CANCEL’.
Create new user
In this section you will see pictures and a short explanation on how to create a new user.

1. Create users via the department view. Click on “+ Add user”
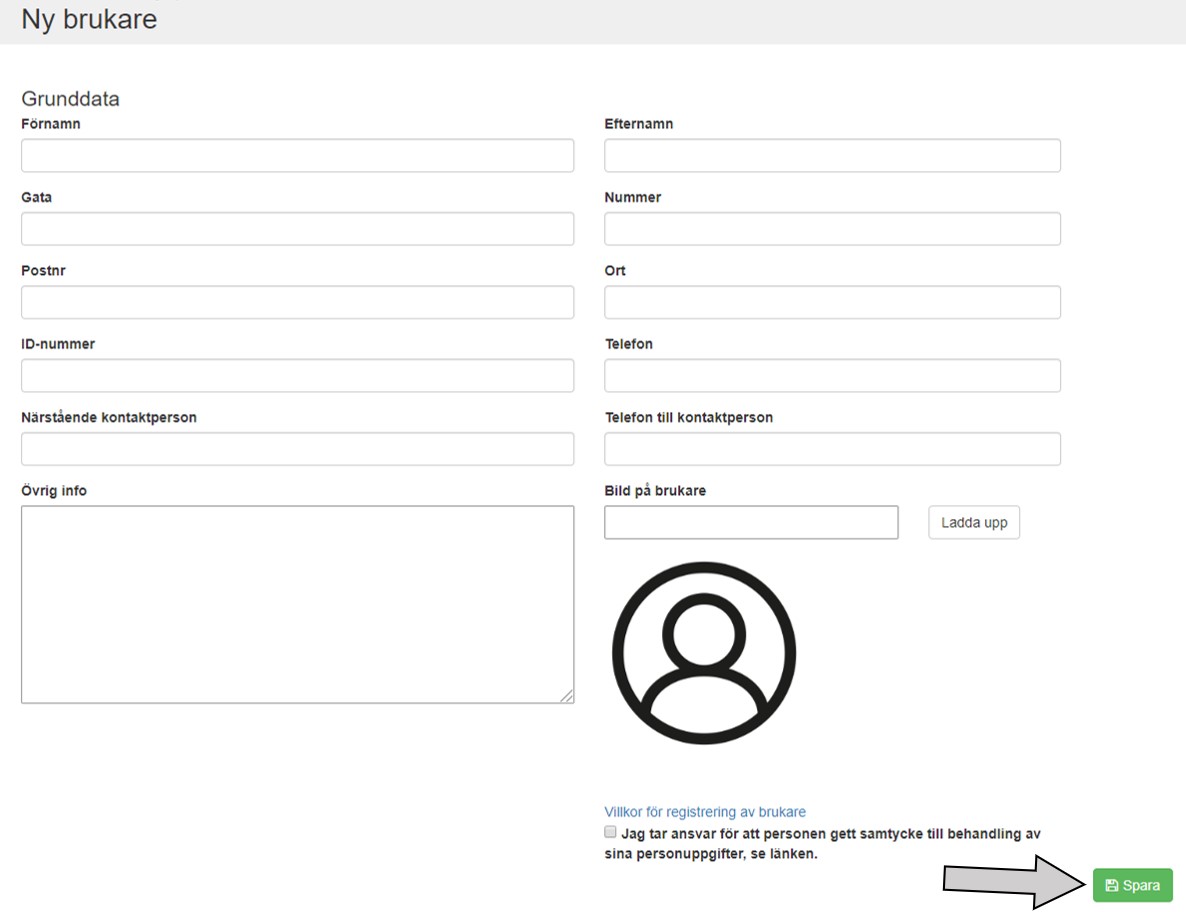
2. fill in the user’s details, tick consent and finish by saving. Tip! Under Other info, you can, for example, fill in a treatment policy.
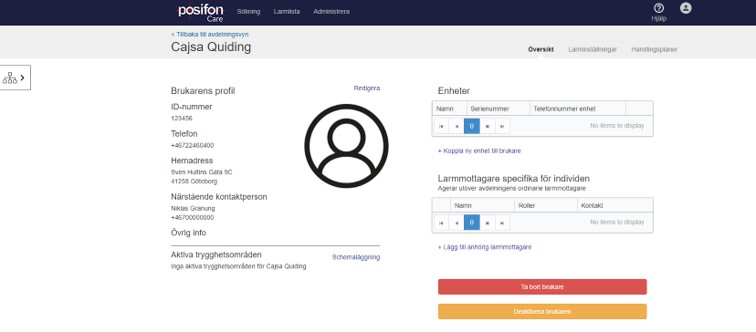
3. Once you have saved the user, you will be taken directly to the user’s profile. Here you can, among other things, edit the user’s information, link the unit, schedule the security area and set user-specific settings. If you want to go back to the ward view, click on “Back to ward view” in the top left corner above the user’s name.
Linking device to user
In this section you will see pictures and a short explanation on how to connect a GPS alarm to a user.

1. In the ward view, click on the eye to the left of the user.
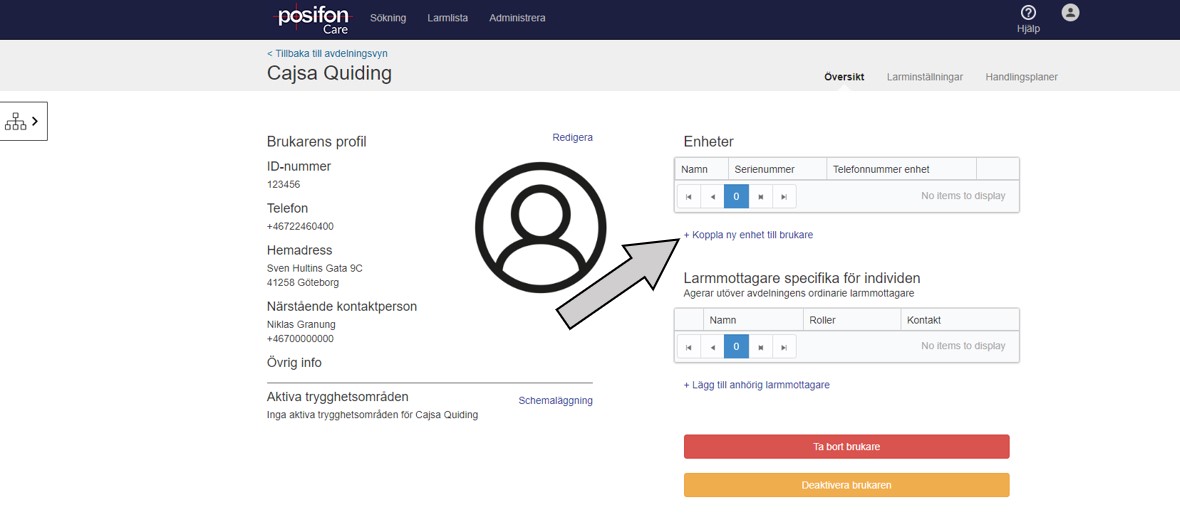
2. Click on “+ Link new device to user”

3. Select the desired GPS alarm from the drop-down list and click save. If the device does not appear in the list, it has not been linked to the department. In this case, contact your administrator or Posifon support for help.
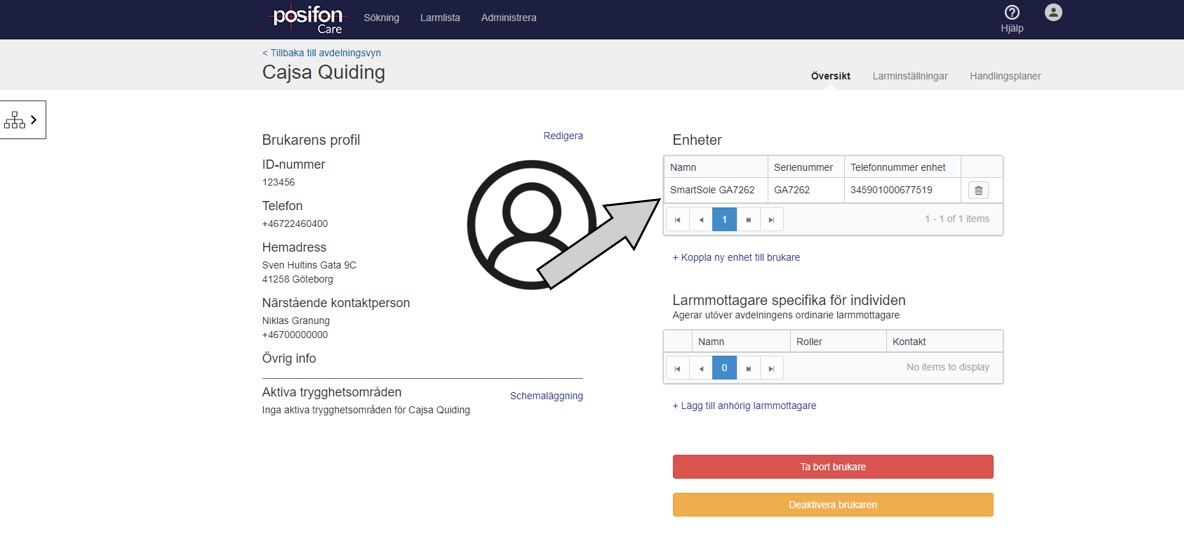
4. Once the GPS alarm is added, it is saved under devices.
Create alarm receivers
In this section you will see pictures and a short explanation on how to create an alarm receiver.

1. on the department view, click on “Add user”.

2. fill in the details of the alert recipient. Choose whether the account should be personalized if it is to be used by one person or impersonalized if it is to be used by several people. Fill in the e-mail address and account name. Select the alarm reception method and fill in the phone number. Always start with the country code, for example +46 and do not use spaces or other characters. Then fill in the password which should contain at least 8 characters, at least one upper and one lower case letter and one number. Then press the green button “Add role”.

3. Select the role in the drop-down list and then tick one or more departments to which the alarm receiver should be linked. Then click on “Save”.

4. Select the home page and home section and check if the user has been trained by PosifonCare. Then click on “Add user”.
Schedule alarm receivers
In this section you will see pictures and a short explanation on how to schedule an alarm receiver.

1. in the department view, click on Alarm settings or Scheduling.

2. click on “Create schedule”.

3. Select the number of shifts and whether to set a splice time when alarms go to both the shifts (relevant if you select more than 1 shift) before and after so that no alarms risk being missed. Fill in the time when the passes apply. If a specific alarm type is not scheduled but goes to the selected alarm receiver, fill it in under Unscheduled alarms go to.
In this case, do not forget to make the change under Alarm types. Then click on save.

4. Select the days on which the alarm receiver should be scheduled and select the alarm receiver from the list. Then click on save.

5. Here you see that the alarm receiver is scheduled. Check that all shifts have a scheduled alarm receiver. If you want to schedule a new alarm receiver, click on “Schedule alarm receiver” and schedule the alarm receiver.

6. Note that the color of the status symbol has been changed from red to green for Alarm Receiver 1 in the “Scheduled” column. This means that the alarm receiver is scheduled.
Creating a safe area
In this section you will see pictures and a short explanation on how to create a safe area.
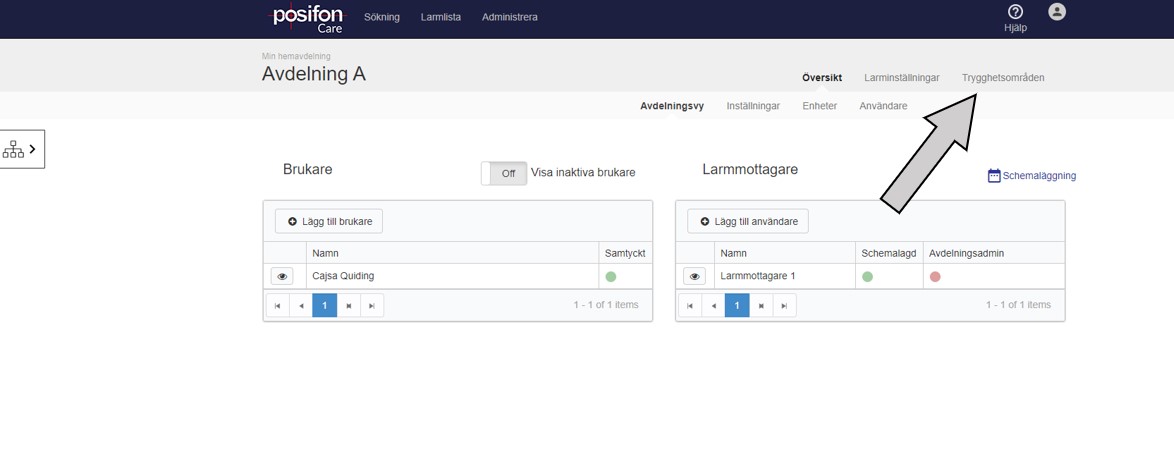
1. on the department view, start by clicking on Safety Area in the menu bar.

2. click on “Add security area”.
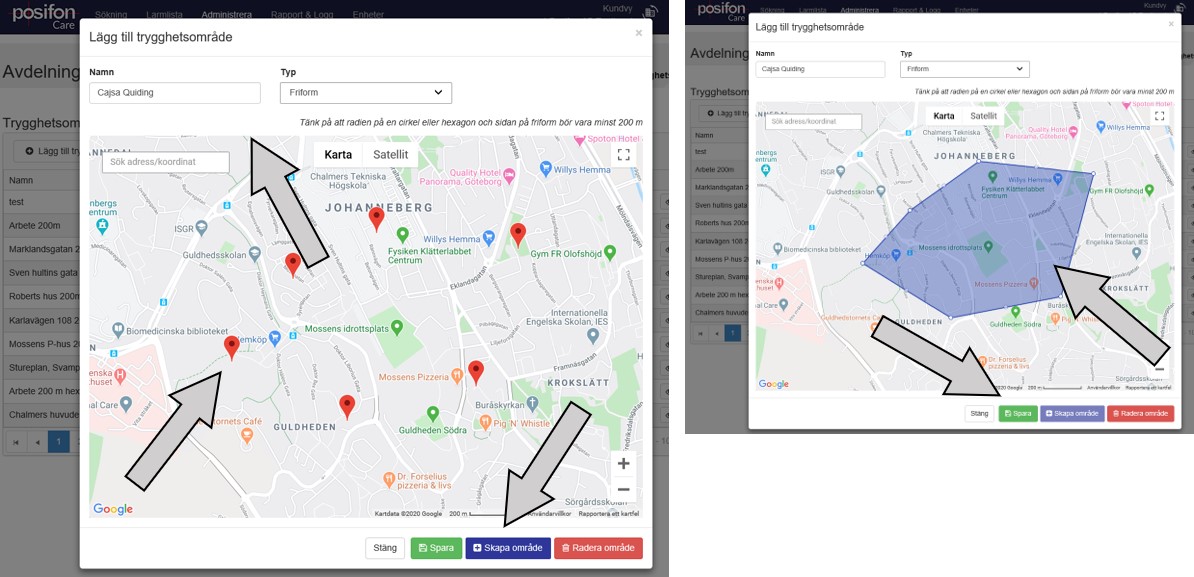
3. Name the area and choose the type of area you want to create. Freeform, circle or hexagon. In this example we create a safety area using Freeform. Keep in mind that the area should be at least 200m. Type in an address that the map should be centered around if the area is not already visible on the map and press enter. Now you can start marking out where you want the area. Press “Create area” to see how the area looks on the map. You can now see the area you have created in the image on the right. If you want to adjust anything, do so by dragging the points in the outline of the area. When you are satisfied, click Save.

4. you can see the security area in the list. If you need to edit the area, click on the eye on the right. If you want to create another safety area, click on “Add safety area” and follow the guide from step 3. Don’t forget to schedule the safety area to the user.
Schedule safe area
In this section you will see pictures and a short explanation on how to schedule a safe area.

1. in the ward view, click on the user’s profile to be able to schedule the safety area.
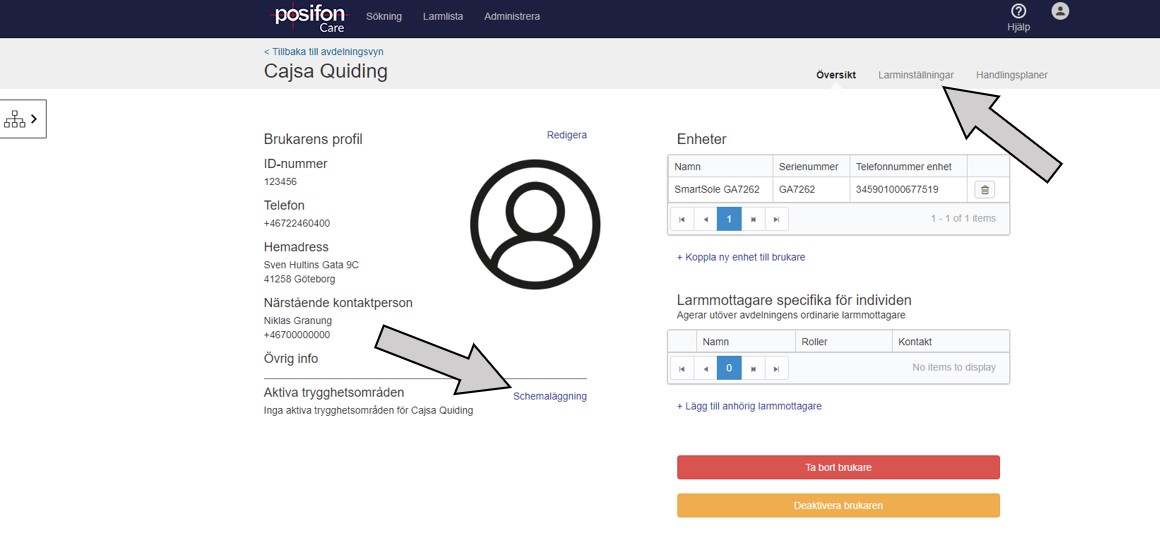
2. Go to Alarm Settings or click on Scheduling to schedule one or more security areas for the selected user.

3. go to Alarm settings, tap on Safety areas and then on “Add safety area”.
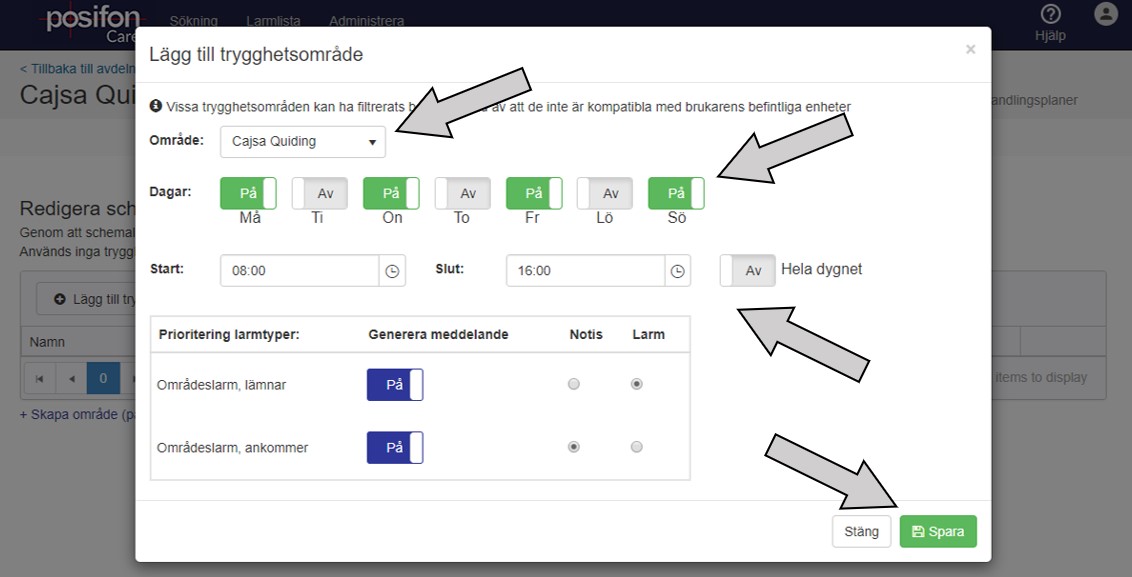
4. Select the security area you want to schedule. Select which days the area will be active. Check whether the area should be active all day or fill in the time when it should apply. Then select whether the security area should be received as an alarm or notification and then press save. If you want to schedule another safety area, follow the guide from step 3. Is there no area in the drop-down list? Either you have not created an area, this is done on the ward, or the user’s GPS alarm does not support the type of area you have created.